
Graveyard Pudding Cookie Cups bring a playful chill to any Halloween table. For more easy pairings, browse our crowd-pleasing Halloween dessert ideas. Imagine layers of silky chocolate pudding and crushed Oreo “dirt,” topped with cookie tombstones and candy pumpkins. These cups are simple to prepare, yet they look like you spent hours in the kitchen. Kids love assembling them, and adults appreciate the nostalgic mix of pudding and cookies. Whether you’re hosting a Halloween bash or planning a classroom celebration, this recipe delivers a spooky dessert that’s as tasty as it is eye-catching.
Print
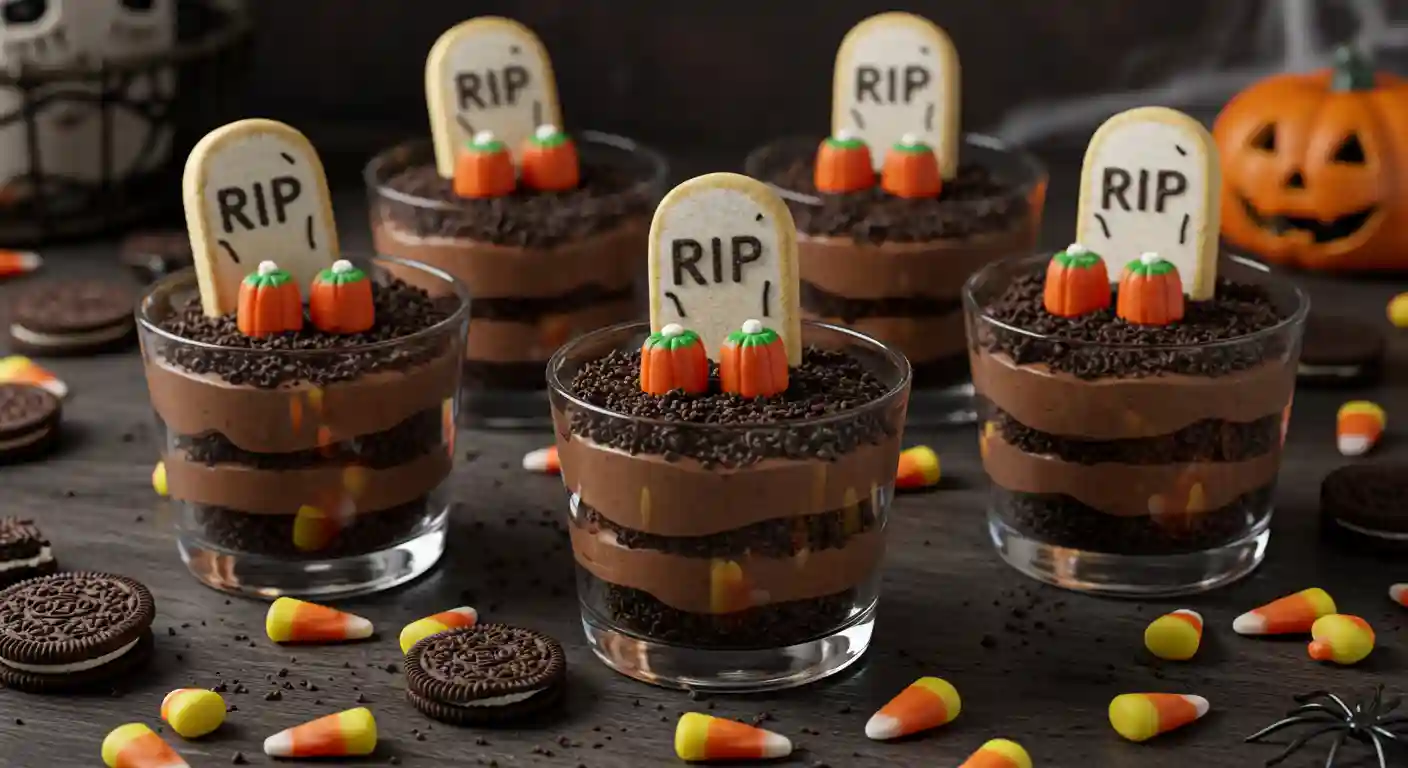
Graveyard Pudding Cookie Cups Recipe
- Total Time: 15 minutes
- Yield: 6 cups
- Diet: Vegetarian
Description
Layers of chocolate pudding, Oreo dirt, and cookie tombstones make these Graveyard Pudding Cookie Cups a fun Halloween dessert.
Ingredients
- 5.1 oz chocolate instant pudding mix
- 3 cups milk
- 8 oz whipped topping
- 24 Oreo cookies, crushed
- 6 Milano or oval cookies for tombstones
- Black frosting or edible marker
- 6 candy pumpkins
- Optional gummy worms or candy bones
Instructions
- Write RIP on Milano cookies using frosting or marker.
- Whisk pudding mix with milk until thickened, fold in whipped topping.
- Crush Oreos into fine crumbs.
- Layer Oreos and pudding in cups, finishing with crumbs on top.
- Insert tombstones, add candy pumpkins and gummy worms.
Notes
- Use clear cups to show layers.
- Refrigerate at least 30 minutes before serving.
- Add coconut flakes tinted green for grass.
- Make ahead up to 24 hours, but add tombstones at serving.
- Prep Time: 15 minutes
- Cook Time: 0 minutes
- Category: Dessert
- Method: No-Bake
- Cuisine: American
Why You’ll Love Graveyard Pudding Cookie Cups
These pudding cups are more than just cute—they’re rich, creamy, and satisfying. You’ll love how the layers of chocolate and Oreo crunch balance in every spoonful. In addition, they’re perfect for kids to decorate and easy to make ahead for gatherings. They’re also budget-friendly since most of the ingredients are pantry staples. Finally, they’re mess-free to serve in individual cups, which makes them a practical and delightful Halloween dessert.
Graveyard Pudding Cookie Cups Ingredients
Before you start, gather everything in one place. That way, once you begin mixing and layering, the process feels seamless and fun, especially if kids are helping.
Pantry & Fresh
| Ingredient | Amount |
|---|---|
| Chocolate instant pudding mix | 5.1 oz box |
| Milk | 3 cups |
| Whipped topping (Cool Whip or whipped cream) | 8 oz |
| Oreo cookies, crushed | 24 cookies |
| Milano or chocolate cookies (for tombstones) | 6 cookies |
| Black frosting or edible marker | as needed |
| Candy pumpkins | 6 pieces |
| Gummy worms or candy bones (optional) | for garnish |

Substitutions for Graveyard Pudding Cups
You can swap Cool Whip with fresh whipped cream for a richer texture. Likewise, graham crackers can replace Oreos if you prefer a lighter crunch. For gluten-free cups, use certified GF sandwich cookies. If Milano cookies aren’t handy, any rectangular or oval cookie works as a tombstone. Moreover, decorations like candy eyes, sprinkles, or tinted coconut “grass” give each cup a personal twist.
Step-by-Step Instructions for Graveyard Pudding Cookie Cups
Time needed: 15 minutes
Before you dive in, line up your serving cups and decorations. This simple prep step makes the process smoother and prevents last-minute scrambling.
- Prepare the Tombstones
First, use frosting or an edible marker to write “RIP” on each cookie tombstone. Then, set them aside to dry while you make the pudding.
- Make the Pudding
Next, whisk pudding mix with milk until thickened. After that, fold in whipped topping to make it fluffy and light.
- Crush the Oreos
Meanwhile, place cookies in a bag or processor and crush into fine crumbs for the “dirt.” This step works well for kids to help with.
- Assemble the Cups
Now, layer Oreo crumbs and pudding mixture, repeating until cups are nearly full. Be sure to save enough crumbs for the final dirt topping.
- Decorate
Finally, insert tombstone cookies, add candy pumpkins, and scatter gummy worms or candy bones for a spooky finish.

Pro Tips for Graveyard Pudding Cookie Cups
Use clear plastic cups so everyone can see the creepy layers. In addition, chill the cups for at least 30 minutes before serving so the pudding sets firmly. If prepping for a party, make the cups a day ahead, but wait to insert tombstones until serving. As a bonus touch, green-tinted coconut flakes can mimic grass for extra Halloween flair.
Variations & Substitutions for Graveyard Pudding Cookie Cups
For gluten-free, choose certified GF pudding mix and cookies. To make dairy-free, swap milk with almond or oat milk and use a non-dairy whipped topping. Vegan versions can use coconut whipped cream and plant-based pudding. Furthermore, for a protein boost, mix in Greek yogurt with the pudding. On a budget? Then, try store-brand sandwich cookies and homemade whipped cream.
Serve Graveyard Pudding Cookie Cups With
Serve these spooky pudding cups with other Halloween favorites like caramel apples, popcorn balls, and candy corn bark for a festive dessert table. They also go wonderfully with savory bites such as pumpkin-shaped quesadillas or mummy hot dogs, giving your party spread the perfect balance of sweet and salty.

Storage & Reheat for Graveyard Pudding Cookie Cups
Refrigerate the assembled cups for up to 24 hours. However, for the best texture, add tombstone cookies just before serving to avoid sogginess. These cups shouldn’t be frozen, since pudding tends to separate once thawed. Always keep desserts chilled at 40°F or below as advised by the USDA Food Safety Guidelines. For info on dairy handling, consult the FDA Dairy Safety Resource. For general dietary balance tips, see the NIH Nutrition Guide.
Nutrition for Graveyard Pudding Cookie Cups
Each cup is about 300 calories with 14 g fat, 42 g carbs, and 4 g protein. Sugar content runs high at 28 g per serving, so these are best enjoyed as a festive treat rather than an everyday dessert. Moreover, always review cookie and candy packaging if you’re preparing these cups for guests with dietary needs.
FAQs
Whisk instant pudding with milk, fold in whipped topping, and layer with crushed Oreos in cups. Then, top with cookie tombstones and candy pumpkins for a spooky look.
The main ingredients are chocolate pudding, milk, whipped topping, Oreos, and cookies for tombstones. In addition, you can add gummy worms, candy bones, or candy eyes for decoration.
Yes, assemble the cups up to 24 hours in advance. However, to keep them looking fresh, wait to add cookie tombstones and delicate candy until right before serving.
Use Milano or oval cookies as tombstones and write “RIP” with frosting or an edible marker. Then, add candy pumpkins, worms, or tinted coconut flakes for extra spooky detail.
More Like This
If you loved these spooky pudding cups, you’ll enjoy more Halloween treats from our kitchen:
- Halloween Oreo Brownies – Fudgy brownies swirled with Oreos and festive sprinkles for a chewy bite.
- Cauldron Cookies – Colorful cookies decorated to look like bubbling witch cauldrons, perfect for parties.
- Frankenstein Rice Krispie Treats – Classic Krispie treats transformed into friendly green monsters kids can help make.
- Ghoulish Stuffed Mushrooms – A savory Halloween appetizer that balances sweet desserts with a hearty bite.
Save This Recipe for Later
Love these spooky pudding cups? Then, pin this recipe to your Halloween board, share it with friends, and bookmark it for your next party. You’ll be glad to have a quick and festive dessert ready when October rolls around.